Request Onboarding
After initiating an onboarding request, Permission Assist walks you through a series of questions. Refer to the sections below for more information about each step.
Who
|
Question/Option |
Description |
||||||||||||||||||||||||||||||||||||
|---|---|---|---|---|---|---|---|---|---|---|---|---|---|---|---|---|---|---|---|---|---|---|---|---|---|---|---|---|---|---|---|---|---|---|---|---|---|
|
Enter all the personnel details of who is being onboarded |
This area allows you to add essential employee or Identity information.
|
||||||||||||||||||||||||||||||||||||
|
Any Additional Instructions or explanation? |
This area allows you to add any additional notes, instructions, or comments that may be helpful for the Provision Team as they onboard this new person. Within this comments area you can:
When all information is complete, select the Request Change button. The request is created. |
Access
This area is displayed after completing the required information in the "Who" step. The employee's personal information is summarized at the top of the page, and the "Add additional access that has been pre-approved" section is displayed.
Automatic
If the employee matches to an access model, this section displays the Entitlement Roles the employee matches to. Any roles displayed in this area will be used to determine the applications and permissions given to this person.
Optional
This area shows additional Entitlement Roles that can be selected.
When
This area is displayed after completing the required information in the "Access" step, and allows you to determine when the request will begin.
|
Question/Option |
Description |
|---|---|
|
Immediate |
Select this option if you want the onboarding process to be completed as soon as possible. |
| Scheduled |
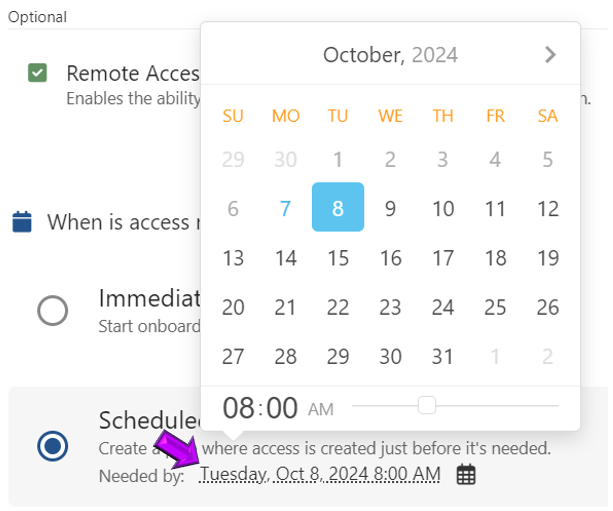
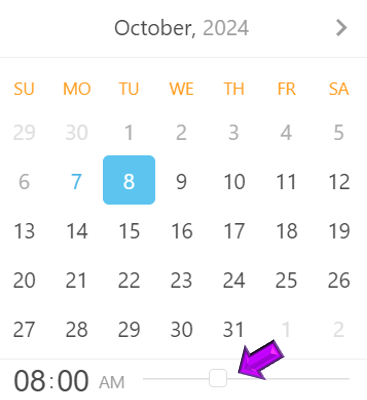
Select this option if the onboarding process needs to be completed by a date and time in the future. For example, if a new employee has made a commitment to start, but they have to give two weeks notice to their previous employer and would like to start in 3 weeks, you can schedule work to be completed three weeks from today. After selecting this option, click on the date and time link next to "Needed by" (see example below). Then, select the date and time the work needs to be completed. Use the slider to select the time the work needs to be completed (see example below). Provision engineers may be able to start working on this early, based on the number of days in the System Configuration > Taskboards > Personnel Events page. |
Comment
This area allows you to add any additional notes, instructions, or comments that may be helpful for the Provision Team as they onboard this new person.
|
Question/Option |
Description |
|---|---|
|
Any Additional Instructions or explanation? |
Within this comments area you can enter comments and additional information. You can also:
|
 .
.
